 Ply Yard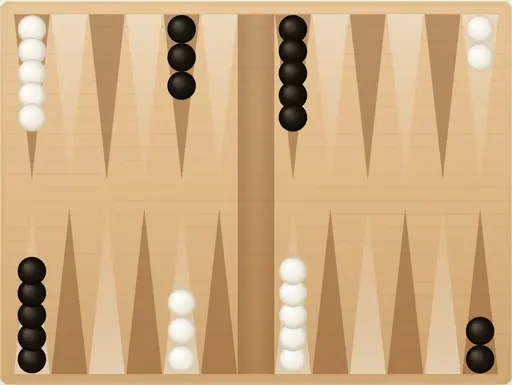
About Backgammon
The dice determine the available movements, but their order and allocation remain strategic decisions. Enter checkers from the bar first, maximize legally playable dice, and assess the completed position rather than an isolated landing. Bearing off requires a check of the entire home board: a high roll does not authorize removing an arbitrary checker. Distinguish compulsory plays from choices about point-making, blot exposure, and efficient distribution.
- Ruleset covered
- Standard backgammon movement on Ply Yard: White starts; no doubling cube or cumulative match scoring
- Updated
- · Editorial policy and corrections
BackgammonRules and variant distinctions
Points, direction, and the standard starting position
Backgammon is played on 24 triangular points. Each player has 15 checkers moving in opposite directions toward their own home board. Using White's numbering, White moves from point 24 toward point 1; Black moves the other way. When discussing the starting position from either player's own perspective, place two checkers on the 24-point, five on the 13-point, three on the 8-point, and five on the 6-point. These counts total fifteen. Your home board comprises your points 1 through 6. The opponent's home board is where your hit checkers must re-enter. Keep player-relative numbering distinct from a fixed on-screen numbering scheme: the same physical point has a different number from the opposite player's perspective. Ply Yard starts with White. That is a platform convention, not a description of the usual competitive opening roll. Before choosing a move, establish your direction, identify your home board, and locate any checkers on the bar. Those facts determine which dice plays are legal.
Separate dice plays and the obligation to use them
Roll two dice on your turn. Each die represents a separate movement. With 5 and 3, you may move one checker five points and then three, reverse that order if legal, or move different checkers. A checker using both dice must have a legal intermediate landing point; adding the values does not allow it to jump a blocked intermediate destination. Rolling doubles supplies four plays of that value: double 4 gives four separate four-point movements. A checker may land on an empty point, a point occupied by friendly checkers, or a point containing exactly one opposing checker. A point containing two or more opposing checkers is blocked. Intervening points need not be empty; the required landing points for each die must be legal. You must use both dice if a legal sequence permits it. With doubles, use as many of the four plays as legally possible. If the two unequal dice can each be used individually but no legal sequence uses both, you must use the higher value. If only the lower value is legally playable, use that lower value. Pass only when no die can be played. Check alternative orders and checker choices before concluding that a die is unusable; you may not choose a sequence that wastes an otherwise playable die merely to keep a checker safe. Strategically, compare the resulting positions of complete legal sequences. Making a point with two checkers protects that point from landing attacks. Spreading checkers may improve flexibility but expose single checkers. Evaluate those tradeoffs only after satisfying the dice-use requirements.
Blots, hits, and mandatory entry from the bar
A single checker on a point is a blot. An opponent landing there hits it and places it on the bar. While you have any checker on the bar, you must enter those checkers before moving any checker already on the board. Entry uses the opponent's home board and obeys the normal landing restrictions. From your own point numbering, a die of 1 enters on your 24-point, 2 on your 23-point, and so on through 6 on your 19-point. The entry point must be empty, occupied by your own checkers, or occupied by one opposing checker. Entering onto an opposing blot hits it. Two or more opposing checkers block entry on that point. If one die provides legal entry and the other does not, enter with the playable die first. Once the bar is empty, use any remaining die if legally possible. If checkers remain on the bar, the remaining plays must also be entry plays. When no legal entry is available, you cannot use those dice to move a different checker on the board. A hit is valuable only in context. Inspect the opponent's entry points and the strength of the home board they must enter. A hit that leaves several vulnerable blots may surrender the initiative; a hit backed by blocked entry points can delay the opponent. Do not judge every hit as automatically superior to making a secure point.
Bearing off and distinguishing the winning results
You may bear off only when all your remaining checkers are in your home board and none is on the bar. A die matching an occupied point lets you remove a checker from that point. If the matching point is empty and no checker remains on a higher-numbered home-board point, you may use the oversized die to remove a checker from your highest occupied point. You may not arbitrarily remove a lower checker while a higher one remains. For example, with checkers on your 5-point and 3-point, a 6 may bear off from the 5-point, but not from the 3-point while the 5-point remains occupied. A 4 cannot bear off the checker on the 3-point while a checker remains on the 5-point; look for a legal move within the home board instead. If you are hit during the bear-off phase, re-enter and return every remaining checker to the home board before bearing off again. The first player to bear off all fifteen checkers wins. If the loser has borne off at least one checker, the result is a single game. If the loser has borne off none, it is a gammon unless the additional backgammon condition applies: the loser still has a checker on the bar or in the winner's home board. That additional condition does not create a backgammon once the loser has already borne off a checker. Ply Yard does not use a doubling cube or accumulate match scores across games. Players may agree to a draw in this implementation. Do not assume cube decisions, match-equity calculations, or competitive draw procedures are part of this board's interface.
A practical turn and review routine
Read the side-to-move display, roll the dice, and select the checker to play. Resolve your bar checkers first. The board prevents illegal destinations, but you should still plan the complete dice sequence rather than evaluate only the first landing. Against the computer, you may choose White or Black; if you choose Black, the computer takes the platform's first turn. Use this decision order: must I enter from the bar; which sequences use the required dice; which sequence makes useful points or exposes blots; and, once all remaining checkers are home, which legal sequence bears off efficiently? During contact play, inspect possible hits and entry restrictions. Once the opposing forces have passed each other and can no longer hit, emphasize remaining travel and efficient distribution for bearing off. In replay, identify the roll and list the legal alternatives available at that moment. A poor subsequent roll does not by itself prove that the earlier move was a mistake. Compare avoidable exposure, point-making, and flexibility in the resulting positions. Hints depend on the selected computer level; they are training assistance, not a certified optimal-play analysis.
Practical strategy
Reconstruct the starting position from each player's perspective: two checkers on 24, five on 13, three on 8, and five on 6. Mark both movement directions and home boards.
Count exactly fifteen checkers for each side and distinguish player-relative point numbers from the displayed orientation. Do not accept a starting arrangement whose counts fail to total fifteen.
From your 13-point, compare 5 then 3 with 3 then 5. Make your 8-point blocked by two opposing checkers, and leave your 10-point and 5-point available.
Show that 13–8–5 is illegal because the first landing is blocked, while 13–10–5 is legal. Explain why an available final point does not erase an illegal intermediate landing.
Construct home-board positions and test an exact bear-off, an oversized bear-off, and a lower checker with another checker still on a higher point.
Use the highest occupied point to test oversized bearing off. Explain why a 6 can remove from the 5-point when it is highest, but cannot arbitrarily remove from the 3-point while a checker remains on 5.
A common misconception
Two dice can be combined into one movement that ignores a blocked intermediate landing.
Each die is a separate play. A checker using both must land legally after the first die as well as after the second. Check both orders and the obligation to use the maximum legally playable dice.
Position study: Enter from the bar before moving a board checker
You have one checker on the bar and roll 2 and 5. The entry point for 2 is blocked by two opposing checkers. The entry point for 5 is available. After entering with 5, a legal 2-point movement remains.
May you first use 2 on a board checker and then enter the bar checker with 5?
Show the answer and analysis
No. Use 5 to enter first. Once the bar is empty, use the remaining 2 for a legal movement. Bar-entry priority prevents the proposed reverse order.
Dice values are separate plays, not permission to disregard entry priority or intermediate landings. The fact that 2 cannot initially enter does not mean it is unusable for the whole turn: entry with 5 can unlock a legal board play. Use both dice when that complete legal sequence exists, rather than voluntarily abandoning a playable die to avoid risk.
This position was constructed for instruction. It is not a tournament record or an engine-verified proof of an optimal move. Evaluate it under the stated conditions; do not assume unlisted features of the complete position.
Structured practice
Understand the rules
Verify the standard starting distribution: 24-point two, 13-point five, 8-point three, and 6-point five, using each player's own numbering.
Assessment: Count fifteen checkers on each side and identify the direction and home board. Do not mistake an incorrect distribution for a standard setup.
Compare candidate moves
Compare both orders of 5 and 3 from your 13-point, with 8 blocked and 10 and 5 available.
Assessment: Reject 13–8–5 and accept 13–10–5. Explain the intermediate-landing restriction rather than considering only the eight-point total.
Review and verify
Test exact and oversized bearing off, including a lower checker while a higher home-board point remains occupied.
Assessment: Check the entire remaining home-board distribution. An oversized die may remove from the highest occupied point, not an arbitrary lower point.
Frequently asked questions
Who moves first on Ply Yard's backgammon board?
White starts in this implementation. Against the computer, you can choose either color; choosing Black lets the computer roll for the first turn. This fixed-White convention should not be confused with the opening-roll procedure used in competitive backgammon.
Can one checker use both dice?
Yes, provided each separate landing is legal. With 5 and 3, the same checker may move five points and then three, or three and then five if that order is legal. The intermediate point matters: an open final point does not allow you to combine the dice into one jump over a blocked landing.
Why do doubles supply four plays?
Doubles are played four times rather than twice. Double 4 supplies four separate four-point movements, which may be allocated among checkers as legality permits. Each landing must be legal, bar-entry priority still applies, and you must use as many of the four plays as possible.
Can I move a board checker while one of my checkers is on the bar?
No. Enter your bar checkers first. If no die permits entry, you cannot spend it on an ordinary board move. If you empty the bar with one die and the remaining die has a legal board play, you must then use it. With multiple checkers still on the bar, entry remains the priority.
Which die must I use when I cannot play both?
If both unequal values can be played individually but no legal sequence uses both, play the higher value. If only the lower value is legal, play the lower one. Before applying this rule, check different checker choices and both orders: a legal sequence using both dice takes priority. You pass only when neither die can be used.
Can I bear off before all my checkers are home?
No. Every remaining checker must be in your home board and none may be on the bar. Checkers already borne off do not need to return. If a checker is hit during bearing off, enter it and bring it home again before resuming removal; the other home-board checkers cannot be borne off while it remains outside.
With a checker on the bar and a roll of 2 and 5, can I play 2 on the board before entering with 5?
No. In the stated position, the entry point for 2 is blocked, the entry point for 5 is available, and a legal 2-point move exists after entry. Enter with 5 first, then use 2 once the bar is empty. You cannot reverse that sequence to move a board checker while the bar checker is unresolved.
Can I add the dice together to bypass a blocked intermediate point?
No. Each die is a separate play with its own landing requirement. You may pass points between those landings, but you cannot ignore a blocked landing by announcing only the total. Try the other order or another checker, and choose a complete legal sequence that satisfies the dice-use requirements.
Put your understanding into practice.
Choose one skill to work on in your next game. A clear reason for each move is more useful than an immediate win.
Play BackgammonRules sources and editorial notes
- Current rules for this game on Ply Yard
Identifies the board variant and interface described here. Platform instructions are not a complete statement of every tournament ruleset.
This guide combines the relevant board's rules with independently constructed examples and exercises. It distinguishes basic rules, variant-specific provisions, and strategic advice. Rules sections draw on the sources listed above. Instructional positions have not been presented as exhaustively engine-verified or certified by professional players.
Written by Ply Yard. Independent review by a named professional player has not been completed. To report an issue, send the game, ruleset, position, and relevant source provision to contact@plyyard.com.